Finite state machines
Last time we described the first use case of our new roboadvisor product, as well as it’s overall architecture. Today we are going to start the implementation of the runner. The source code for this article can be found on github.
Last time we described the first use case of our new roboadvisor product, as well as it's overall architecture. Today we are going to start the implementation of the runner. The source code for this article can be found on github.
$ git clone git@github.com:nblotti/Pheidippides.gitAs discussed in the previous article, the runner has a lot (too much) responsibilities for our MVP. To manage this complexity and make it easier to split it later, we are going to use a finite state machine. Finite state machine, or FST, are restricted Turing's machine with no memory, predefined states (finite states) and a set of possible transitions between those states.
I have always had a lot of respect for Alan Turing and what he has accomplished. I was happy to see that it's memory has been honored lately. It is in my opinion the minimum the government could do after all he he had to go through during it's life. It has been determined that he died by killing himself, possibly eating an apple containing cyanide. But enough with Alan Turing, let's start to work.
The set of states and the possible transitions are visible in figure 2.
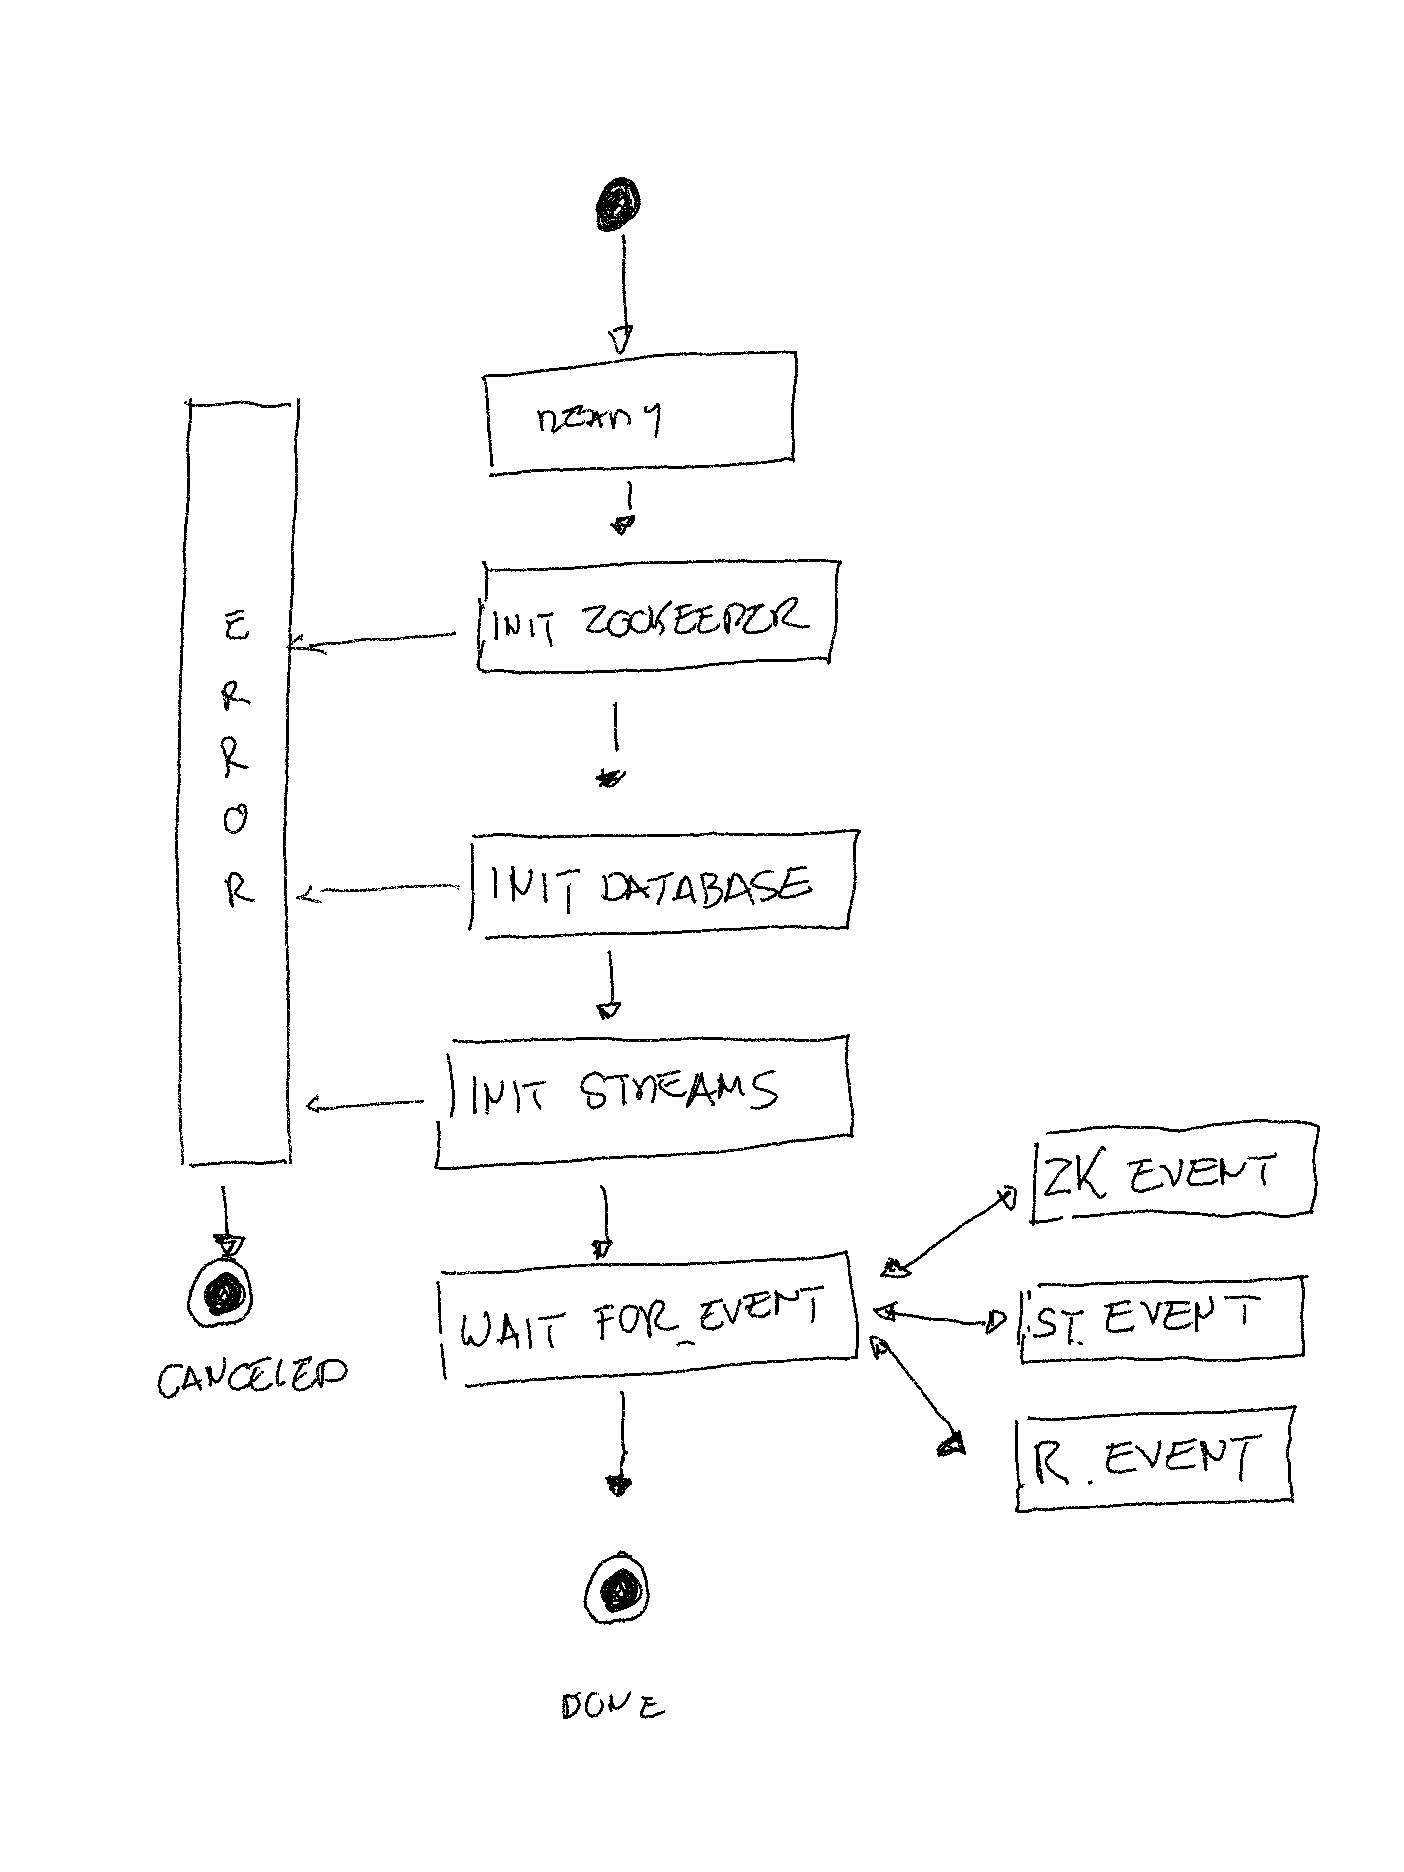
Figure 2 : the runner's states
Today we will be covering the project creation and the INIT_ZOOKEEPER state implementation. At the end of this article, we will also briefly talk about it's deployment.
Pheidippides
The project is a Spring Boot application. If you don't want to clone the project, you can go to Spring initializr (figure 3) and generate a simple Spring Boot application. Don't worry about dependencies, we are going to add them later. Just make sure to add Lombok, to avoid writing boilerplate code. Generate the project, download it and import it in your favorite IDE.
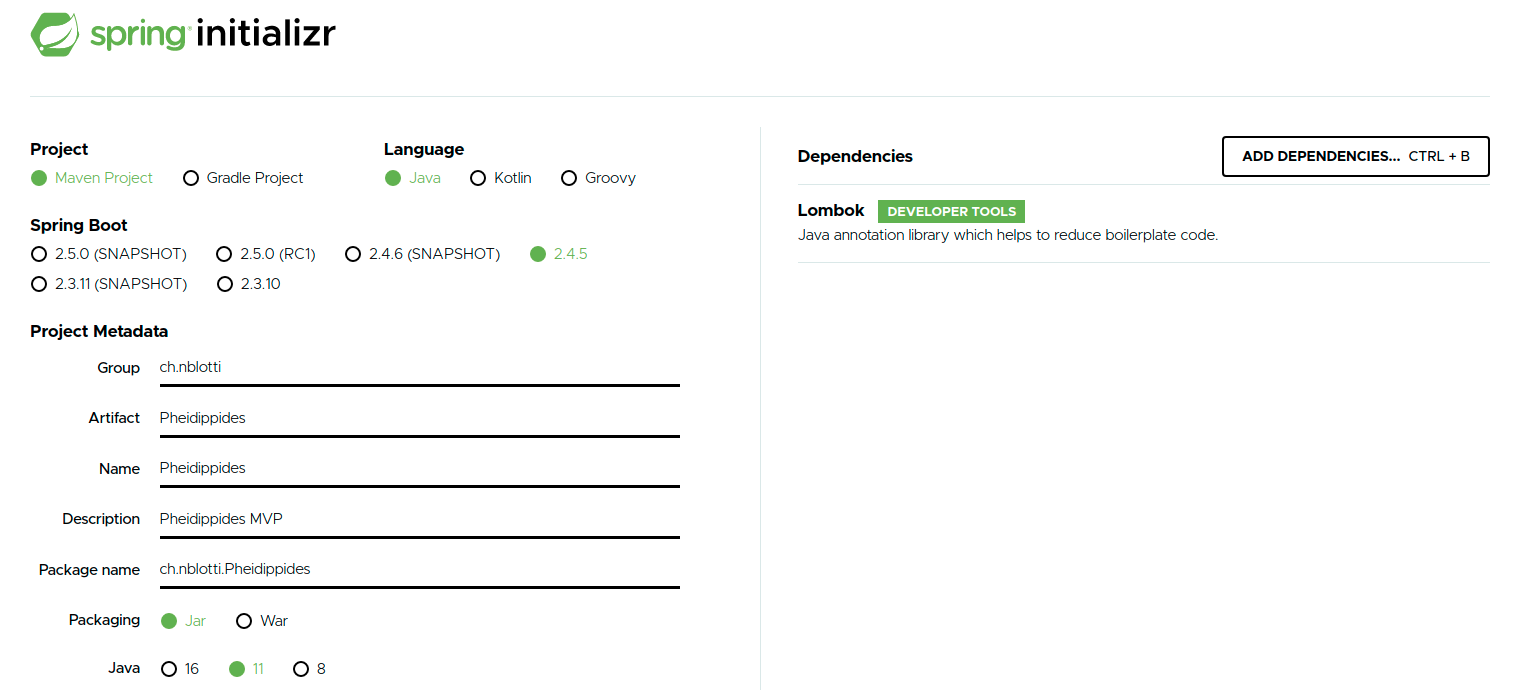
Figure 3 : Spring Initializr
The project relies on Spring StateMachine framework. The learning curve is very steep (short) and it is very convenient to use.
    <dependency>
      <groupId>org.springframework.statemachine</groupId>
      <artifactId>spring-statemachine-starter</artifactId>
      <version>2.4.0</version>
    </dependency>

    <dependency>
      <groupId>org.springframework.statemachine</groupId>
      <artifactId>spring-statemachine-test</artifactId>
      <version>2.4.0</version>
      <scope>test</scope>
    </dependency>
Figure 4 : Spring StateMachine dependencies
The minimum configuration requires you to define two enums and two classes. A first enum for states, a second for events, one class to configure your FSM and a second to be informed of state changes.
Let's start by defining our states. (figure 5)
public enum STATES {
  READY,
  INIT_ZOOKEEPER,
  INIT_DATABASE,
  INIT_STREAMS,
  WAIT_FOR_EVENT,
  TREATING_EVENT,
  ERROR,
  DONE,
  CANCELED;

}
Figure 5 : The runner's state
The second enum defines events that trigger transitions. (figure 6)
public enum EVENTS {
  EVENT_RECEIVED,
  EVENT_TREATED,
  SUCCESS,
  ERROR,
  QUIT;
}
Figure 6 : The runner's event
Now that states and events are defined, let's create and configure the state machine. Our class extends Spring's EnumStateMachineConfigurerAdapter and is typed with our states and events. (figure 7)
@Slf4j
@Configuration
@EnableStateMachineFactory
public class PheidippidesStateMachine extends EnumStateMachineConfigurerAdapter<STATES, EVENTS> {
@Override
  public void configure(
    StateMachineConfigurationConfigurer
      <STATES, EVENTS> config) throws Exception {
     //this method configures the configurer
  }
  @Override
  public void configure(StateMachineStateConfigurer<STATES, EVENTS> states) throws Exception {

     //this method configures the states
  }
  @Override
  public void configure(StateMachineTransitionConfigurer<STATES, EVENTS> transitions) throws Exception {

     //this method configures the transition
  }
}
Figure 7 : The State machine configuration
The @Configuration and @EnableStateMachineFactory annotations trigger the instantiation of a state machine factory based on the provided configuration. We'll use this factory later to instantiate our StateMachine (figure 8)
  @Bean("stateMachine")
  @Scope("singleton")
  public StateMachine<STATES, EVENTS> stateMachine() {

    return stateMachineFactory.getStateMachine();

  }
Figure 8 : The State machine instanciation
As can be seen from figure 7, we have to override three methods of EnumStateMachineConfigurerAdapter to configure 1. the configurer, 2. the states 3. the transitions.
Let's focus on the second method and configure the states (figure 9). All states need to be mentioned here. The state() method is used to add a "standard" type of state. Besides standard states, Spring StateMachine supports "pseudo" states like choice, junction, fork, etc. The only pseudo states we use are using here is the initial and end states.To learn more on pseudo states, please refer to documentation.
  @Override
  public void configure(StateMachineStateConfigurer<STATES, EVENTS> states) throws Exception {
        states.withStates()
      .initial(STATES.READY)
      .state(STATES.INIT_ZOOKEEPER)
      .state(STATES.INIT_DATABASE)
      .state(STATES.INIT_STREAMS)
      .state(STATES.WAIT_FOR_EVENT)
      .state(STATES.TREATING_EVENT)
      .state(STATES.ERROR)
      .end(STATES.DONE)
      .end(STATES.CANCELED);

  }
Figure 9 : The state defnitions
All possible transitions are defined in the third method (figure 10). For every possible transition, we define a source, a target and the event that triggers the transition between both states. When no event is given, the transition is triggered implicitly.
  @Override
  public void configure(StateMachineTransitionConfigurer<STATES, EVENTS> transitions) throws Exception {
    transitions.withExternal()


...


.source(STATES.WAIT_FOR_EVENT).target(STATES.TREATING_EVENT).event(EVENTS.EVENT_RECEIVED)
      .and()
      .withExternal()
      .source(STATES.TREATING_EVENT).target(STATES.WAIT_FOR_EVENT).event(EVENTS.EVENT_TREATED)
      .and()
      .withExternal()
      .source(STATES.TREATING_EVENT).target(STATES.ERROR).event(EVENTS.ERROR)
      .and()
      .withExternal()

...

}
Figure 10 : The transition defnition
The listener (figure11) is notified whenever there is a change in our FSM's state. The class is annotated @WithStateMachine to inform Spring that it is candidate for participating with the state machine events.
@WithStateMachine
@Slf4j
public class PheidippidesStateMachineListener {

  private final ClientService clientService;

  ...

  @StatesOnEntry(target = STATES.INIT_ZOOKEEPER)
  public void initZookeeper() {


  }

  ...

  @StatesOnEntry(target = STATES.TREATING_EVENT)
  public void treatingEvent() {

  }


}
Figure 11 : The state machine listener
Every method of this class is annotated with @StatesOnEntry to request Spring to invoke the method when it enters the source state. @StatesOnEntry (figure 12) is a custom annotation. You need to create a custom annotation if you want to use enums as states and events, it is not required if you decide to use with strings
@Target(ElementType.METHOD)
@Retention(RetentionPolicy.RUNTIME)
@OnStateEntry
public @interface StatesOnEntry {

  STATES[] target() default {};

}
Figure 12 : Custom enum event listener
Tests
For those of you who live by Kent Beck's book "Test Driven Development: By Example", Spring created a StateMachineTestPlanBuilder (figure 13). You can use it to test your FSM config.
A short example can be found in PheidippidesStateMachineTest.
@SpringBootTest
@ExtendWith(MockitoExtension.class)
@ExtendWith(SpringExtension.class)
@ContextConfiguration(classes = {PheidippidesStateMachine.class})
class PheidippidesStateMachineTest {
@Autowired
private StateMachineFactory<STATES, EVENTS> stateMachineFactory;
private StateMachine<STATES, EVENTS> stateMachine;
@BeforeEach
public void setup() throws Exception {
stateMachine = stateMachineFactory.getStateMachine();
...
}
@Test
public void testReady() throws Exception {
StateMachineTestPlan<STATES, EVENTS> plan =
StateMachineTestPlanBuilder.<STATES, EVENTS>builder()
.stateMachine(stateMachine)
.step()
.expectState(STATES.READY)
.expectStateMachineStopped(0)
.and()
.build();
plan.test();
}
}
Figure 13 : StateMachineTestPlanBuilder
Zookeeper
ZooKeeper (ZK) allows distributed processes to coordinate with each other through a shared hierarchical namespace which is organized similarly to a standard file system. A name is a sequence of path elements separated by a slash (/). Every node in ZK's namespace is identified by a path.
Nodes have a type. One specific type is worth mentioning : the ephemeral type. Ephemeral nodes exist as long as the session that created them is active. When the session ends, they are automatically deleted by zookeeper. This functionality will be very useful to let active runners interact.
The project uses Zkclient (figure 14) that offers a convenient interface to connect and communicate with our ZK cluster.
  <dependency>
      <groupId>com.101tec</groupId>
      <artifactId>zkclient</artifactId>
      <version>0.11</version>
  </dependency>
Figure 14 : zkclient dependency
The zkclient is defined as a singleton (figure 15) as it holds our connection to ZK.
 @Bean
  @Scope("singleton")
  ZkClient zkClient() {

    return new ZkClient(connectString, 12000, 3000);
  }
Figure 15 : zkclient dependency
The connection URI (figure 16) is in the form hostname1:port1,hostname2:port2,etc.
kafka1:2181,kafka3:2181
Figure 16 : connection string
If you need to install zookeeper, please refer to the official documentation. You may also decide to leverage on an existing installation. I use the same cluster as the one installed along Apache Kafka.
The application ZK structure (figure 17) is straightforward. Under the application root (rstrategy), there is a node (clients) containing the list of client (xxx, yyy, etc.). Every client node contains the client preferences (max runners allowed, database info) and a node per strategy. The client is initialized when a new client registers and is updated every time he subscribes to a new strategy. We are going to add more nodes later on, but let's keep it simple for now. Remember that ZK has not been designed to hold data : if required, we'll use ZK to store a reference to the data, not the data itself.
/rstrategy/clients/xxx/liveNodes
                  /xxx/nodesAllowed
                  /xxx/db/dbUser
                  /xxx/db/dbPassword
                  /xxx/db/dbUrl
                  /xxx/strategies/a
                  /xxx/strategies/b
/rstrategy/clients/yyy/liveNodes
...
Figure 17 : Zookeeper structure
Table 1 contains a short description of every ZK node. The LiveNodes node is important : all it's sub-nodes are ephemeral. A new entry is added for every runner subscribing to the client. When a runner is informed by ZK of a change in the liveNodes of the client he subscribed to (a new runner joining or leaving) it starts to reconfigure itself.
| Leaf | Description |
|---|---|
| Clients | Identity of a client (user). Every user has one node in our zookeeper directory. |
| LiveNodes | Number of active runners subscribed to this client |
| NodesAllowed | Maximum number of runners allowed to subscribe to this client |
| db | Information related to the client's database (uri, user, password, etc.) |
| Strategies | Information related to the strategies that the client has subscribed to. |
Table 1: Zookeeper structure description
The ClientService has been created to encapsulate all ZK low level complexity and communicate with the outside world. The service main responsibilities are to :
- Proxy the zkclient access, encapsulating all connection boilerplate .
- Offer a high level interface to let consumers elect and subscribe to a client.
- Make sure that the list of client's strategies to manage are updated continuously, based on underlying ZK events.
- Broadcast any changes in the list of strategies to manage or in the client 's information through high level events, making sure to provide updated client information along with the message.
The service exposes a single method (figure 15), to subscribe to an available client.
  public void subscribe() {

    // get the first free client
    String clientName = selectFreeClient();

    // register as a client listener in Zookeeper
    registerToClientChanges(clientName);

    // send a sucess message to the state machine
    buildAndSendUpdatedMessage(clientName, EVENTS.SUCCESS);

  }
Figure 18 : the subscribe method
All implementation details can be found in the ClientService class. The algorithm used by the runner to select the strategies can be found in the chooseStrategy method. When a runner detects that it is the only subscriber to a given client, it manages all the client's strategies. When more than one runner are subscribed to the same client, they split the work using their position in the liveNodes node and the number of strategy this client has registred to.
A ClientDTO (figure 16) with all client's updated informations is sent along with the message broadcasted by the ClientService
@AllArgsConstructor
@NoArgsConstructor
public class ClientDTO {

  @Getter
  private String userName;

  @Getter
  private List<StrategiesDTO> strategies;

  private ClientDBInfo clientDBInfo;


  public String getDbUrl() {
    return clientDBInfo.getDbUrl();
  }

  public String getDbUser() {
    return clientDBInfo.getDbUser();
  }

  public String getDbPassword() {
    return clientDBInfo.getDbPassword();
  }


}
Figure 19 : the DTO
Finally, the ClientService is injected in the state machine listener (figure 18) to let the runner subscribe when it enters the INIT_ZOOKEEPER state.
Entry in the INIT_DATABASE and TREATING_EVENT states are triggered by events sent by the service. In both case, the ClientDTO is available in the method signature.
@WithStateMachine
@Slf4j
public class PheidippidesStateMachineListener {
  private final ClientService clientService;
  @Autowired
  public PheidippidesStateMachineListener(ClientService clientService)    {
    this.clientService = clientService;
  }
 ...
  @StatesOnEntry(target = STATES.INIT_ZOOKEEPER)
  public void initZookeeper() {
    clientService.subscribe();
  }
  @StatesOnEntry(target = STATES.INIT_DATABASE)
  public void initDatabase(StateMachine<STATES, EVENTS> stateMachine, @EventHeader ClientDTO clientDTO) {
    stateMachine.sendEvent(EVENTS.SUCCESS);
  }
 ...
  @StatesOnEntry(target = STATES.TREATING_EVENT)
  public void treatingEvent(StateMachine<STATES, EVENTS> stateMachine,@EventHeader ClientDTO clientDTO) {
    stateMachine.sendEvent(EVENTS.EVENT_TREATED);
  }
...
}
Figure 20 : StateMachineListener adapted
Deployment
The project contains a jenkins pipeline example. In this example, jenkins
- Release the project
- Build the docker container and push it to DockerHub
- Deploy the docker image to our Kubernetes cloud.
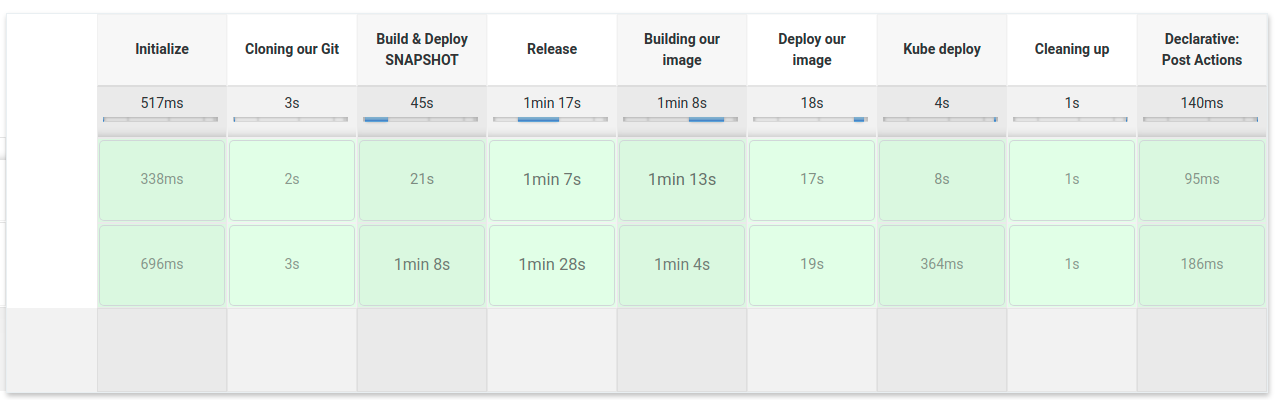
Figure 21 : Jenkins pipeline exectuion
The dockerfile is modified and copied during the build. The docker image is based on adoptopenjdk/openjdk11.
Once that the pipeline has been built, we can check that the pods are deployed and running on our kubernetes cloud :

Figure 22: The runners deployed
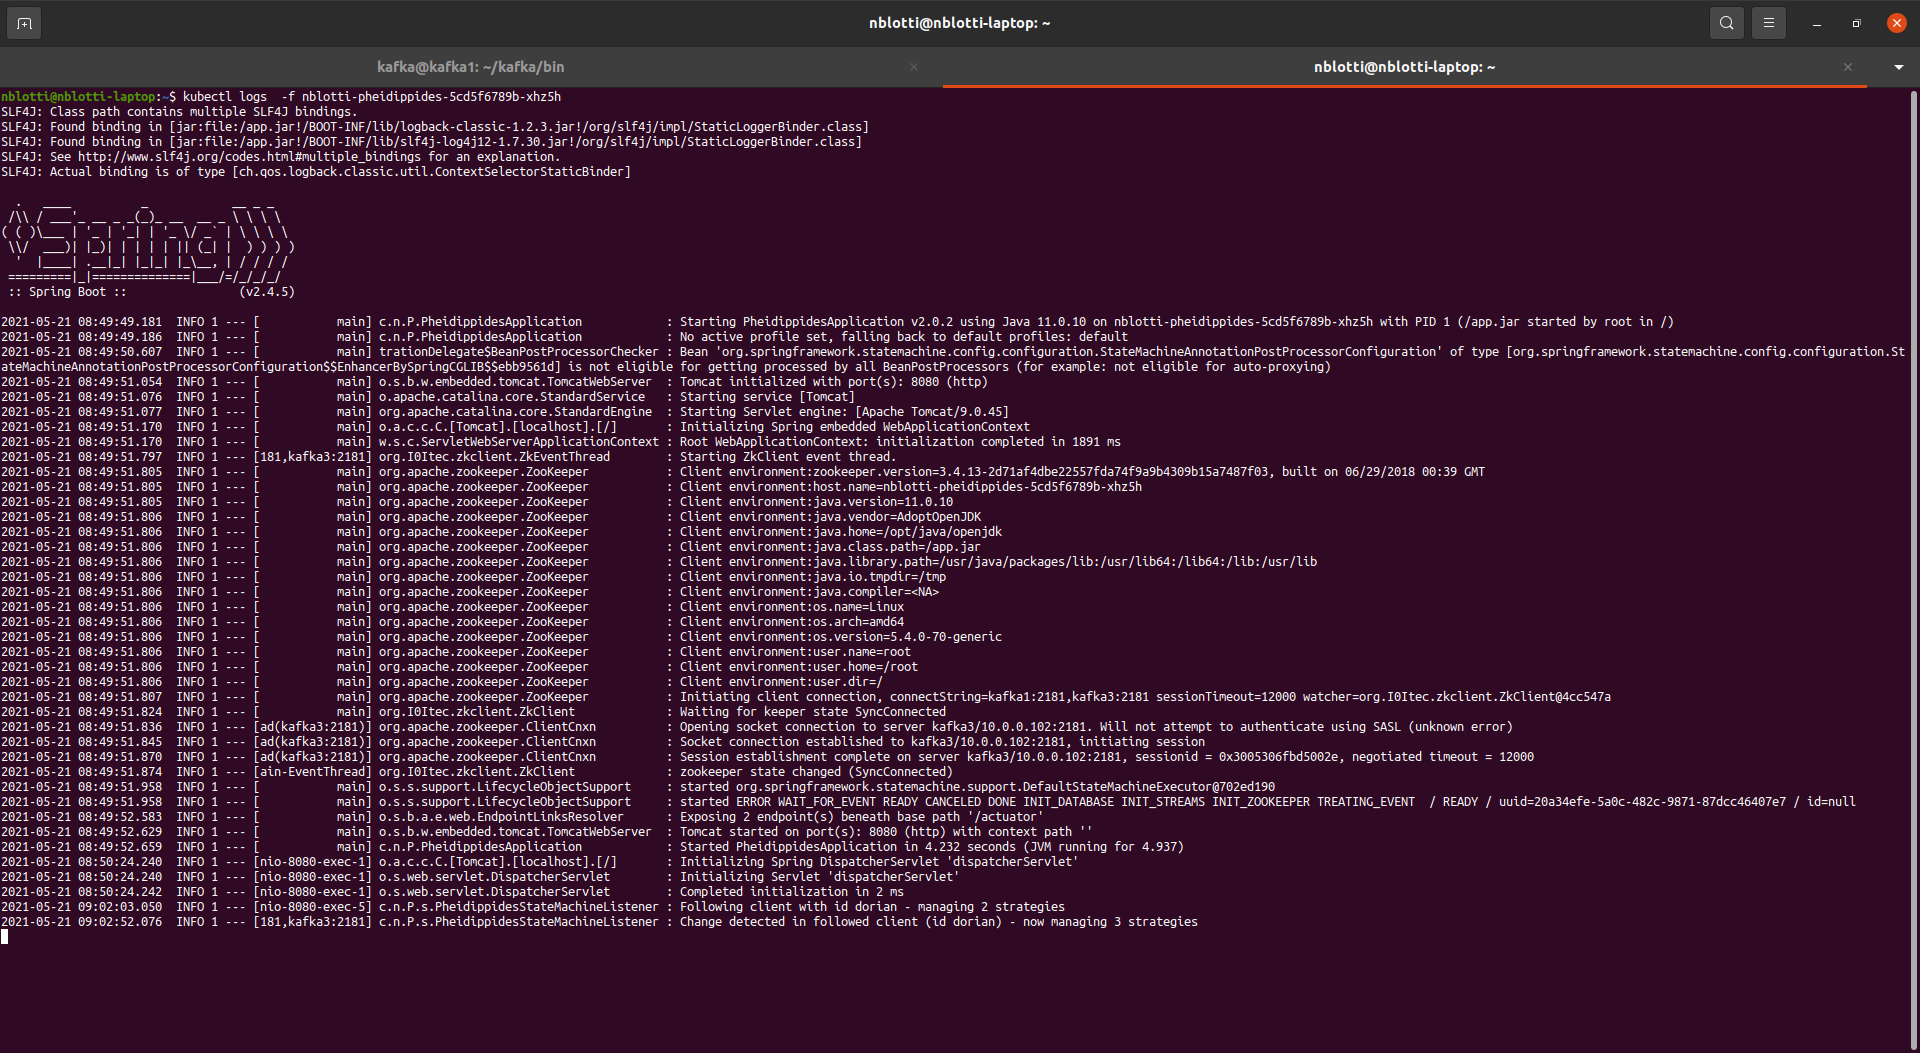
Figure 23: The runner running logs
We have now a distributed, auto-configurable application running. Next time we will discuss how to connect it at runtime to a database, using the info retrieved today in ZK.